
Create your account
Getting started with TutorManager takes only a few minutes. Every school receives its own isolated database and custom subdomain (such as myschool.tutor-manager.com), with a 14-day free trial and no credit card required.
Sign up for the free trial
To register your school, visit the signup page at https://tutor-manager.com/#signup.
- Company information:
- Company name: The display name of your school or tutoring center.
- App address: Choose your unique school address (e.g.
myschool.tutor-manager.com). The form checks availability in real time. Use lowercase letters, numbers, and hyphens only. - Legal name: Your official registered business name (used for billing and invoices).
- Tax number (VAT): Your business tax/VAT identification number (e.g.
SI12345678). - Registration number: Your official company registration number.
- Contact person:
- Enter your First name, Last name, Email, and optional Phone. This email address will become the initial Administrator account.
- Account settings:
- Country: Select your business location from the dropdown.
- Default language: Choose your primary interface language (Slovenščina, English, Deutsch, Hrvatski, or Italiano).
- Package: Choose a plan — Solo or Solo AI for individual tutors, Starter, Professional or Enterprise for teams. See the pricing for what each includes.
- Billing period: Choose Monthly or Annual.
- Website: Optional URL of your current school website.
- Address (optional):
- Provide your Address line 1, Address line 2, City, and Postal code. These appear on your issued invoices.
- Initial password:
- Enter your initial password (minimum 8 characters).
- Consent & confirmation:
- Agree to the Terms of Service and Privacy Policy, complete the security check, and click Create my free account.
No credit card required
You do not need to enter payment details to start your 14-day trial. During the trial you can use everything included in the package you chose — schedule real lessons, add students and issue invoices.
What happens after signup
Once you submit the registration form:
- Environment provisioning: TutorManager automatically sets up an isolated environment for your school.
- Confirmation email: You receive a confirmation email containing your direct school login URL (
https://[your-subdomain].tutor-manager.com). - First login: Open your school's subdomain URL and sign in using your registered email and password.
Bookmark your school URL
Your team, teachers, students, and parents will all log in through your dedicated subdomain (e.g. myschool.tutor-manager.com).
The onboarding wizard
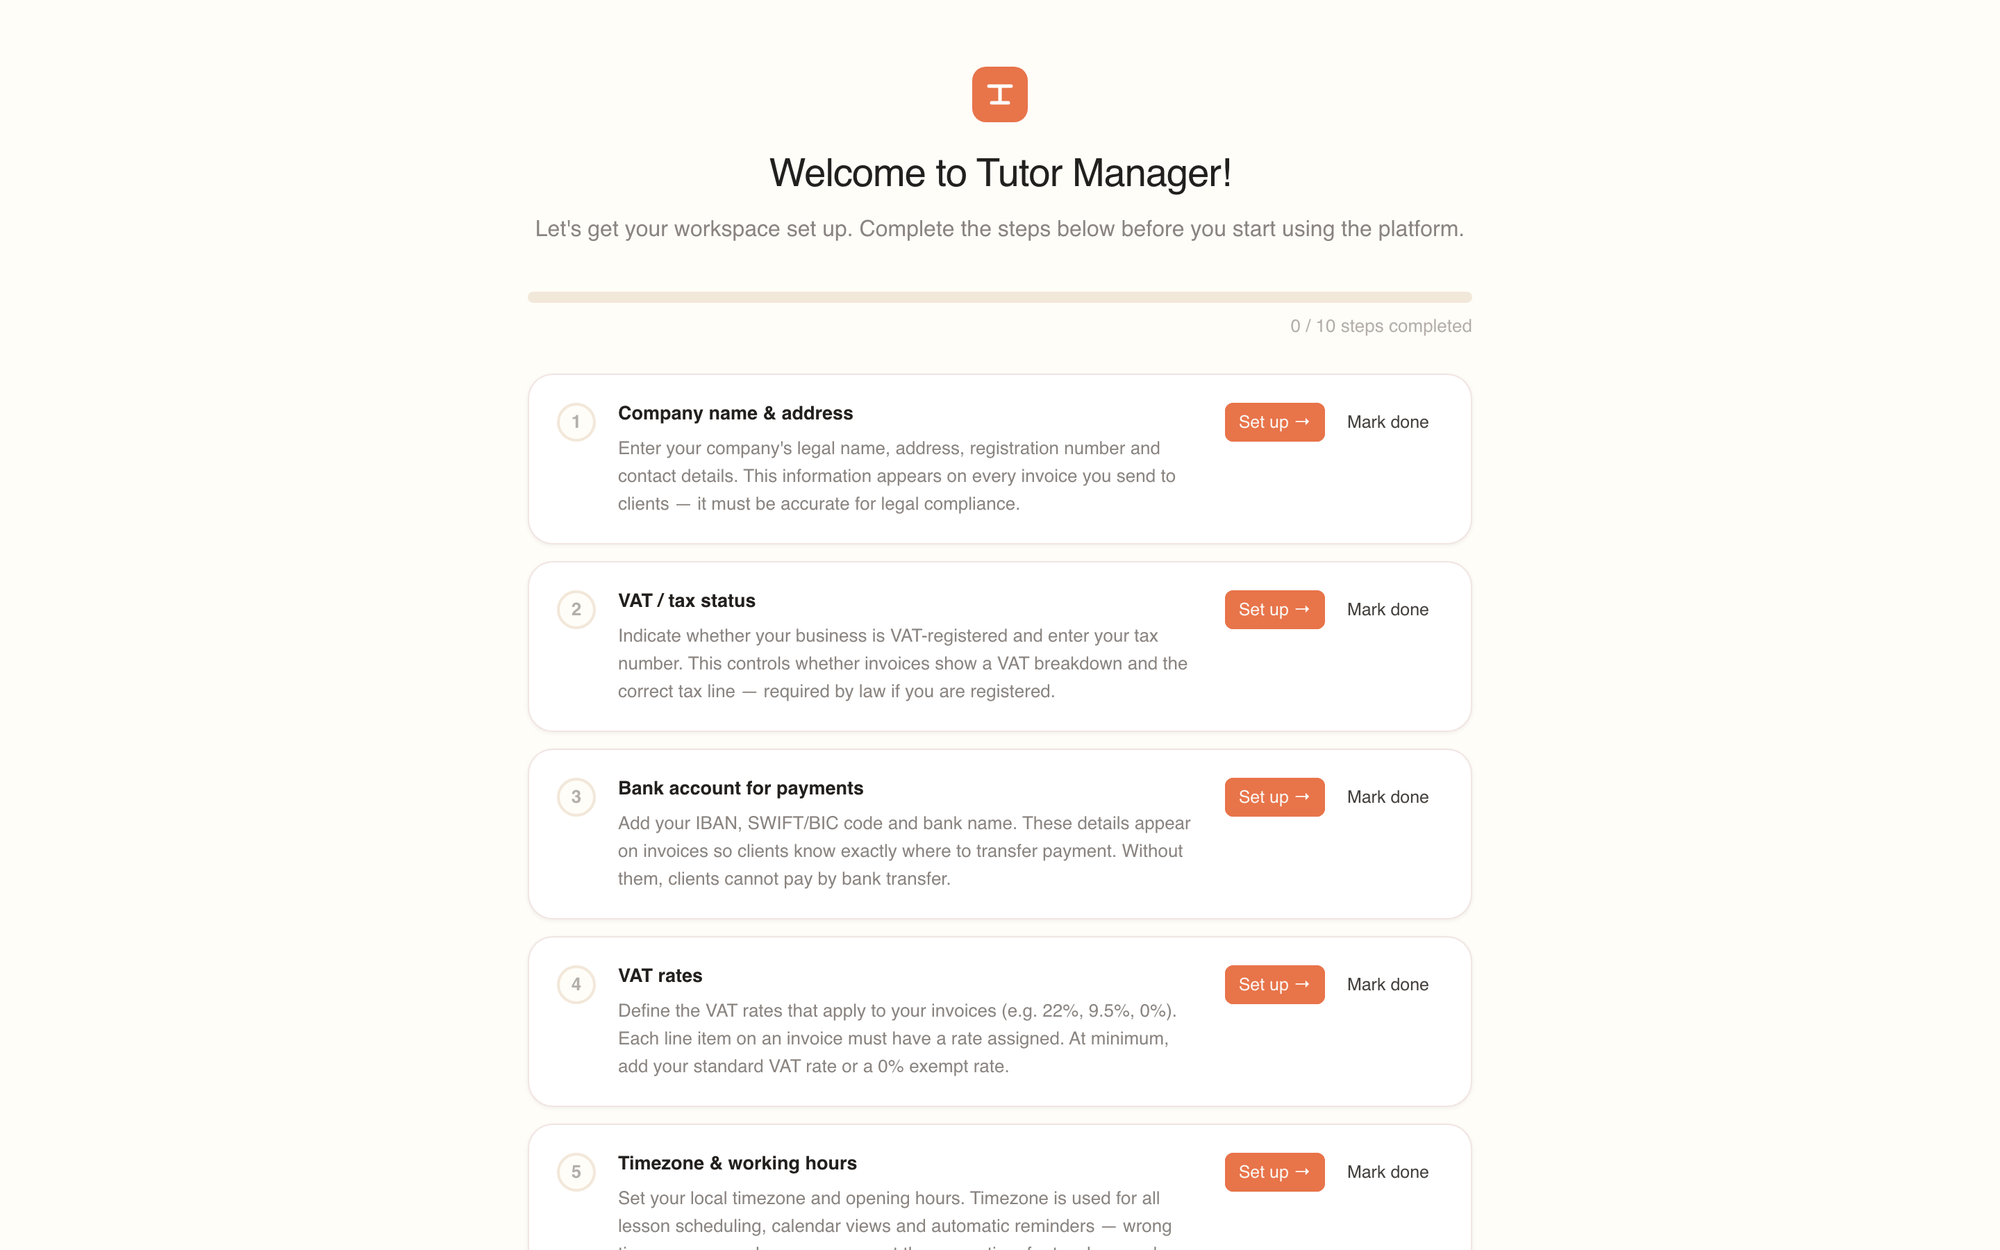
When you log in as an administrator for the first time, TutorManager welcomes you with the onboarding checklist. This guided checklist ensures your school has all necessary operational settings in place before you schedule your first lesson.
The wizard guides you through 10 essential setup steps:
| Step | Setting | Why it is needed |
|---|---|---|
| 1 | Company name & address | Appears on every invoice you issue; required for legal tax compliance. |
| 2 | VAT / tax status | Determines whether your invoices display a VAT breakdown and legal tax lines. |
| 3 | Bank account for payments | Sets your IBAN, BIC/SWIFT, and bank name so clients can pay by bank transfer. |
| 4 | VAT rates | Defines standard (e.g. 22%), reduced, or exempt (0%) tax rates for billing items. |
| 5 | Timezone & working hours | Ensures lesson times and reminder emails match your local time. |
| 6 | Subjects | Defines what you teach (e.g. English, Mathematics, Piano). Required before adding lessons. |
| 7 | Course types | Structures offerings into individual sessions, group courses, or workshops. |
| 8 | Lesson durations | Sets standard lesson lengths (e.g. 45 min, 60 min, 90 min) used for scheduling and pricing. |
| 9 | Pricing rules | Establishes rates per subject and duration so invoices calculate automatically. |
| 10 | Add your first teacher | Creates a teacher user profile and assigns subjects so they can receive lessons. |
For each step, click Set up to jump directly to the relevant settings page, or click Mark done if you have already completed it. If you prefer to explore the app first, click Skip for now to go straight to the Dashboard.
The "Complete setup" sidebar widget
If you skip or pause any onboarding steps, an onboarding progress widget remains visible near the bottom of your sidebar:
- It displays the Complete setup label with a progress bar and completion count (for example,
6/10). - Clicking the widget re-opens the checklist anytime.
- When all 10 steps are complete, the widget automatically disappears from the sidebar.
Recommended setup checklist
To ensure a smooth transition for your staff and clients, we recommend configuring settings in this order:
- Company settings: Confirm your business name, address, tax details, and payment IBAN.
- Locations & rooms: Add physical school branches and classroom names.
- Subjects, course types & durations: Set up your academic catalog.
- Prices, discounts & tax rates: Configure hourly rates, family discounts, and applicable tax rates.
- Holidays: Review public holidays and add school vacations so recurring schedules automatically skip them.
- Users & families: Invite teachers and register your active students and their parent contacts.
Trial period & subscription
While your trial is active, a status banner appears at the top of the interface:
- Trial duration: 14 days from registration.
- Proforma invoice: Before your trial period concludes, TutorManager automatically sends a proforma invoice to your contact email.
- Activating your plan: Once the proforma is paid, your subscription transitions seamlessly to active without any interruption to your data.
- Grace period: If the trial ends before the proforma is paid, you still have 7 days of access; the banner shows how many days are left. After that the account is blocked, and accounts that stay unpaid are permanently deleted.
If you have questions about upgrading or customizing your package, contact support anytime at info@zinz.si.